Fluffy Cuddle Sheep
- The Crafty Rancher

- Jun 23, 2019
- 3 min read
Updated: Sep 26, 2019
These fluffy little friends are squishy and fun to cuddle with, throw around, and even count to fall asleep! This is a simple craft which can be sewn by hand. I created this pattern when I was a young teen. Older children could make these sheep on their own. Children will enjoy snuggling with them while they sleep. You can make them whatever colors you want, and even put numbers on their sides to make "counting" sheep. Click the following link to view and print the PDF version of the instructions: https://static.wixstatic.com/ugd/a6eaab_728c1902122d48809c04d272f3fc7e6a.pdf

You will need:
· Fluffy fur for the body and hair (8x13 inches)
· Felt for the head, hooves and tail
· Googly eyes (3/8”), preferably sew-on
· Stuffing
· Black and white thread
· Yarn and cowbell (optional)
· Pattern (included in the instructions below)
Directions:
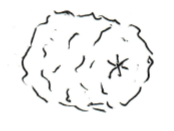
1. Cut an 8” x 13” rectangle from the fur for the sheep body.

2. Fold the rectangle in half with right sides together, and sew the short ends together, leaving ¼ inch seam allowance.

3. Stitch around one end (by hand), using double threaded, very large stitches. Leave the needle threaded and pull it tight to make as tight of a pucker as possible.

4. With the needles still attached, stitch through the pucker several times from different directions to secure the pucker as tight as possible.
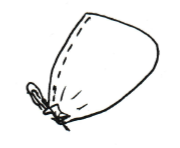
5. Now stitch around the other end, the same way as before, but don’t pull it tight yet. Turn it right side out and stuff it to the desired firmness.

6. After stuffing the body, pull the end stitches tight and poke the pucker inward. Stitch across the hole several times, pulling it tight to hide the stitches and reinforce the closure. Now you should have a nice ball.
7. Cut out the two head pieces from the felt, using the pattern below.

8. Sew the two head pieces together, right sides together, sewing close to the edge and leaving the neck part open (as shown with the stitch line on the pattern). Turn the head right side out and stuff it.
9. Cut the hair piece out of the fur, using the pattern below.

10. Fold the hair piece in half and stitch the dart as shown by the stitch lines on the pattern.

11. Cut the excess fabric off the dart if needed.

12. Cut the ears and tail out of the felt, using the pattern below.

13. Fold the tail and ear pieces in half and stitch the straight end together on each one so they stay folded.

14. Sew the ears to the sides of the head where they will meet the hairline. Sew them on so the opening is facing down.

15. Sew the hair piece onto the top of the head so the dart is toward the back of the head. Whipstitch the hairline to sew it down so the edges of the fur won’t fray. The hair line should just touch the tops of the ears.


16. Using a whipstitch, sew the head onto one end of the body, in the center, covering one pucker. Whipstitch all around the neck so the head sticks to the body all around. Be sure the seam on the body is at the bottom of the sheep.

17. Sew the tail over the pucker on the back of the sheep, so the opening of the fold faces down, just like the ears.

18. Sew or glue eyes onto the head in the location that looks best to you.

19. Cut 4 hooves out of felt, using the pattern below.

20. Tack the two ends of each hoof together (at the corner where both flat sides meet) before you sew each one on.

21. After you tack the hoof into a loop, sew each one onto the bottom of the sheep, connecting the flat side (using whip stitches) onto the body.

22. If desired, tie a little cowbell around the neck for more decoration. You can make sheep out of any colors you want. Also, for counting sheep, sew numbers on the sides of each sheep you make. Your sheep is now complete.

Comments